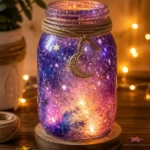
Description
Create a glowing galaxy jar lamp with this easy and customizable craft project, perfect for brightening up your home.
Materials
- Mason jar (any size)
- Black paint (acrylic or spray)
- Glow-in-the-dark paint
- Paintbrushes
- Star stickers or stencils
- Battery-operated tealight or fairy lights
Instructions
- Prepare your jar: Start by cleaning your mason jar thoroughly. Ensure there are no labels or residue left on it.
- Paint the inside: Use a black paint to cover the inside of the jar. You can use a paintbrush for precision. Let it dry completely.
- Add stars: Once the black paint is dry, stick star stickers or use stencils to create your desired star designs. You can also paint stars if you prefer that look.
- Apply glow paint: Lightly apply glow-in-the-dark paint over the stars. This will be what really makes your lamp shine in the dark. Allow the paint to dry according to the package instructions.
- Add lights: Place the battery-operated tealight or fairy lights inside the jar. If using fairy lights, make sure to wrap them carefully around the inside before securing the lid.
- Display your creation: Your DIY galaxy jar lamp is now finished! Find a charming spot to place it, or gift it to someone special.
Notes
Consider layering different shades of glow paint for a vibrant effect. Supervise children when using paints and small items.