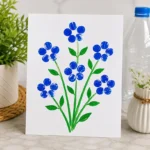
Description
Transform simple plastic bottles into vibrant flower art to enhance your home decor while promoting sustainability.
Materials
- Empty plastic bottles (any size)
- Acrylic paint (various colors)
- Scissors
- Hot glue gun and glue sticks
- Paintbrush
- Wire or sturdy stem materials (optional)
- Decorative embellishments (optional, such as glitter or beads)
Instructions
- Prepare the Bottles: Clean the plastic bottles thoroughly. Remove any labels and rinse out any residue. Let them dry completely.
- Cut the Flowers: Using scissors, cut the bottoms of the bottles to create petal shapes. Adjust the cuts for varying shapes.
- Paint the Flowers: Use acrylic paint to coat your flower shapes. Let the paint dry as instructed.
- Assemble the Flowers: Use hot glue to attach layers of petals together for a fuller flower look.
- Add Stems: Attach wire or stem materials to the bottom of the flower using hot glue.
- Finalize with Touches: Add embellishments like glitter or create leaves using green bottle pieces.
Notes
Consider using different shapes and colors of bottles for a more dynamic look.